
OSRS Dragon Slayer II Quest Guide
Aug-09-2022 PSTThis quest was introduced in the game on the 4th of January 2018. It’s the sequel of the quest ‘Dragon Slayer 1,’ which was introduced in 2001. The quest follows the defeat of Elvarg, where a researcher named Dallas Jones seeks to investigate the dragon’s lair to uncover the mystery behind its attack.
Quest Requirements
• 200 Quest Points
• Legends' Quest
• Family Crest
• Heroes' Quest
• Shield of Arrav
• Lost City
• Merlin's Crystal
• Dragon Slayer I
• Underground Pass
• Biohazard
• Plague City
• Waterfall Quest
• Dream Mentor
• Lunar Diplomacy
• The Fremennik Trials
• Rune Mysteries
• Shilo Village
• Jungle Potion
• Eadgar's Ruse
• Druidic Ritual
• Troll Stronghold
• Death Plateau
• A Tail of Two Cats
• Icthlarin's Little Helper
• Gertrude's Cat
• Animal Magnetism
• Ernest the Chicken
• Priest in Peril
• The Restless Ghost
• Ghosts Ahoy
• Bone Voyage
• The Dig Site
• 100 Kudos
• Client of Kourend
• X Marks the Spot
Skill Requirements
• 75 Magic
• 70 Smithing
• 68 Mining
• 62 Crafting
• 60 Agility
• 60 Thieving
• 50 Construction
• 50 Hitpoints
Items Required
• A pickaxe
• An axe
• 8 oak planks
• 10 swamp paste
• 12 nails
• A hammer
• A machete
• A saw
• Catspeak amulet
• Ghostspeak amulet or Morytania Legs 2+
• Goutweed
• Cut dragonstone
• 2 molten glasses
• Glassblowing pipe
• Chisel
• Spade
• Astral rune
• Seal of passage (if you haven't completed Fremennik Diary Elite)
• Tinderbox
• Pestle and mortar
• Runes for 3 Fire Wave spells OR 3 Fire Surge spells
Recommended Items
• Protection Prayers
• Stamina Potions
• Serpentine Helm/Anti-Venom+
• Musa Point, Fossil Island, Lunar Isle, and Rellekka teleportation means
• Spirit Tree & Glider access
• Food, Prayer Potions, and Combat Equipment
Enough combat levels to defeat Vorkath (level 392), Spawn (level 100), Robert the Strong (level 224), 2 Green dragons (level 79), 2 Blue dragons (level 111), Red Dragon (level 152), Iron dragon (level 189), Brutal green dragon (level 227), Black Dragon (level 227), Steel dragon (level 246), Brutal red dragon (level 289), Mithril dragon (level 304), Adamant dragon (level 338), Rune dragon (level 380), and Galvek (level 608).
Starting Out

To begin this quest, you must first speak to Alec Kincade, who is located outside the Myths’ Guild. The quickest way to get there is by using the Spirit Tree to reach Feldip Hills. He will ask you to join the guild in order to discover an ancient secret, and he’ll also ask you to meet Dallas Jones, located at the Karamja Wines, Spirits, and Beers (Musa Point).
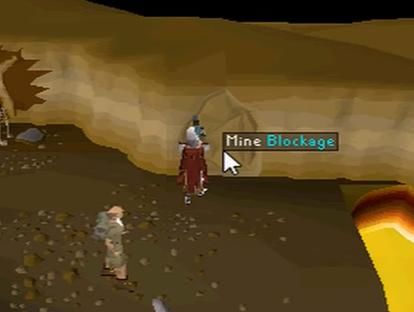
Speak to Dallas, who will then realize that you’re a hero of Crandor because you had slain Elvarg. He will then ask you to meet him in his old lair. So, get back to Crandor through the caves in Karamja’s volcano (opposite direction of the route of Tzhaar). Once you’re inside, climb over the wall and speak to Dallas. Now, use your pickaxe on the north-eastern corner wall, and enter the tunnel to locate an ancient laboratory.
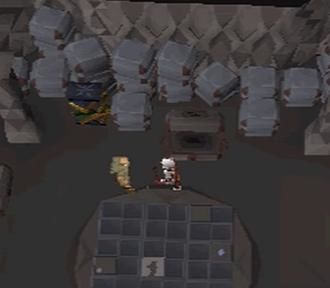
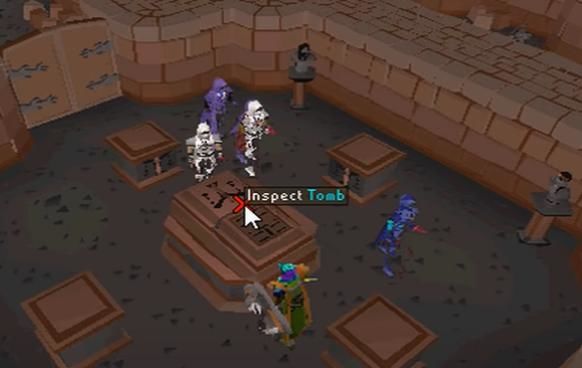
Search the machinery that is on the east of some old notes, and then inspect the ancient mural. That’s when a level 100 NPC will spawn and attack you, so quickly kill it and inspect the ancient mural once again. It will illustrate the word Lithkren for dragons and fungi. Seeing that Dallas will recall an old settlement on the Fossil Island that has the same architecture as the laboratory, and how one of his books mentioned a place called Lithkren there. At the end of the conversation, he will ask you to meet him at the House on the Hill.
The House on the Hill
The quickest way is to use an enchanted Digsite Pendant, but it requires you to have visited the house at least once. If you haven’t, then you can head there on foot. Once you’re inside, climb down the trapdoor and speak to Dallas. He will tell you that he read the book again and it determines that the floor grid is actually a map of the island. Now, he will want you to find 24 map pieces that are scattered around the house.
Five pieces are in the open chest on the same floor. Three in the open chest on the top floor. Seven are south of the house, in a hook briar. Just east of the house, near a strange stone, you can find five more in a mushtree. The final four pieces are in the fungi outside the west staircase.
Once you have all the pieces, speak to Dallas and the map will be completed. There are 24 tiles, and five of the pieces will be stuck to the board, indicating that it’s their final position. The other pieces must be dragged around or rotated to complete the map.
Once that’s done, the puzzle will automatically appear on the floor, and Dallas will determine that the north-westernmost island is Lithkren. He will then ask you to locate Jardric for a boat, and you can find him within the Museum Camp, which is nearby the General Store.
Lithkren
Speak to him on behalf of Dallas, asking him for a boat; however, he will tell you that all the boats are owned by the Varrock Museum. So, you need to build your own with 8 Oak Planks, 10 Swamp Paste, 12 Nails, a Saw, and a Hammer.
You need to head north-west towards the coast, which is west of the Wyvern Cave entrance (Mushroom Forest), and then build the boat there. After building the rowboat, you can freely travel back and forth from the island.
Now, take it and head to Lithkren. Make your way north, go up the stairs located on the eastern part of the southwestern building, and go down the southern trapdoor. From there, go down the northern stairs, follow the path, and then speak to Dallas at the end of the path. He will tell you about the doors he found, but they cannot be opened.
Search the skeleton nearby (east wall) to find Aivas’ Diary. Read it to know about the battle that took place here, and about Robert the Strong, who led the battle as a hero of the fourth age. Speak to Dallas now and tell him Robert was reincarnated as Bob.
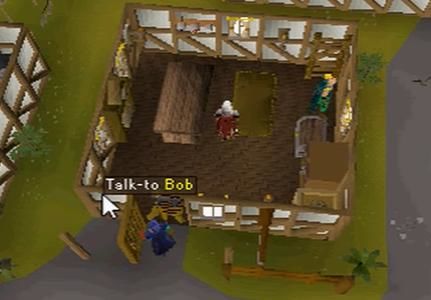
Bob the Cat
Equip your Catspeak Amulet (e) that you obtained from the quest ‘A Tail of Two Cats’ and make your way to one of the common places that he can be found.
You can visit any of the following locations, or direct yourself to the ‘A Tail of Two Cats’ guide for detailed information on how to locate him.
Varrock west bank anvils. Wise Old Man's House in Draynor. Burthorpe in front of the games room. Catherby docks or inside the Fletching shop. Falador east bank/Party room. The southwestern part of White Wolf Mountain, directly north of the Catherby fishing shop. Draynor Manor graveyard. Mudskipper Point near Thurgo. Farming shop south of Falador near the herb patch. Seth Groats' chicken pen north of Lumbridge. Seer's Village anvil. Murder Mystery House's front garden.
Once you have found him, speak to him about his memories as Robert the Strong; however, he won’t be able to remember, so you ask him to speak to Sphinx again. So, travel to Sophanem and speak to her. Before you ask her help, she’ll grant you the ability to speak to cats without the amulet as you’ve proven yourself worthy to be an ally.
Now, tell Sphinx about the issue, but she won’t be able to help you as she can’t access a specific part of his memories, and that’s when it hits your mind that the Oneiromancer would be able to help. Quickly make your way to Lunar Isle (bring your Seal of Passage if you haven’t completed Elite Fremennik Diary yet), and then head to the Astral Altar.
Robert the Strong
Talk to the Oneiromancer about unlocking Bob’s memories, and she will ask you to make another Dream Potion while giving you a Dream Vial. Fill the vial with water, and then add Goutweed to it. Now, use a Hammer to crush an Astral Rune to obtain Rune Shards, and then use the Shards with a Pestle & Mortar to get Ground Astral Rune. Finally, add it to the vial to make the Dream Potion. After that, light the ceremonial brazier that is at the building west, and use the Dream Potion on it.
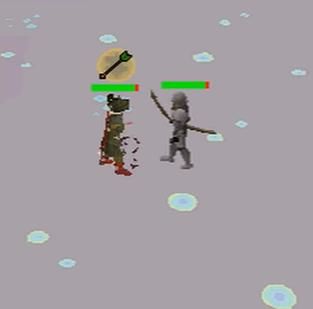
When you enter Bob’s dream, Bob’s equivalent (not Bob) tells you that Robert the Strong needs to be defeated to bring his memories back. He’s a level 224 NPC who uses Ranged attack style, and you can use Protection Prayer during the fight. Do remember that when Robert says ‘Let’s see if you can hide from this!’, you need to run to a pillar and hide behind it because a strong arrow will be shot towards you and it can cause a great deal of damage. He will also end up teleporting you to him while saying that you’re a coward, so be active at such times.
Once the guardian has been killed, Bob will remember everything. A cutscene with Tristan, Robert the Strong, Odysseus, Camorra, and Avias will trigger after that, showing how they are confronting a Dragonkin beneath Lithkren.
The Dragon Key
Bob will tell you that he hid several key parts across Gielinor after the incident occurred and that the Karamja key is hidden on the south coast of the Karamja island (also known as the Kharazi Jungle).
Head to the south-eastern part of the shore to locate staircases that lead to the Karamjan Temple with the key piece in the centre of a maze.
Key #1
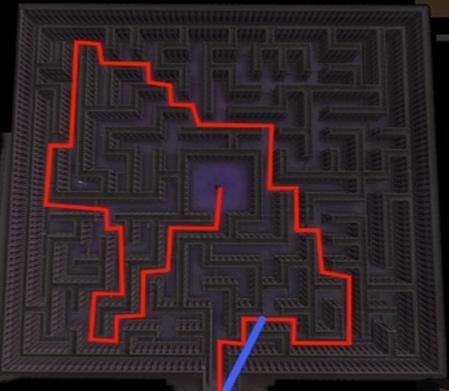
You have to navigate through the maze that consists of spikes and traps. You can disable these spikes with the Thieving skill, and the traps can leap over through Agility. There are also level 124 Stone Guardians wandering around (multi-combat area), and each one of them uses one of the combat styles so you need to pray accordingly. Red means Melee, Green means Ranged, and Blue means Magic.
Once you’ve grabbed the key piece, the plinth will activate a two-way transport between the centre and the entrance.
Key #2
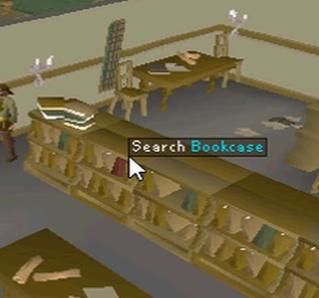
Bob will indicate that the next key piece was held by Tristan, so you need to go to Varrock and speak to Reldo about it. He will tell you that a book might contain information about it and that it was a book with a red cover, but he’s not sure where it’s located. Now, look for a bookcase with a red book and search it to obtain Varrock Census Records. Bring it back to Reldo, and he’ll tell you that Tristan’s descendants have settled in Port Phastmatys.
Equip your Ghostspeak Amulet and head there. Speak to the villagers to locate Sarah in the house that is west of the bank. Actually, you can just go straight to her. Speak to her about the key, and she’ll tell you that it is buried in the swamp for safekeeping from the Vampyres. She believes that not finding the key is the best option.
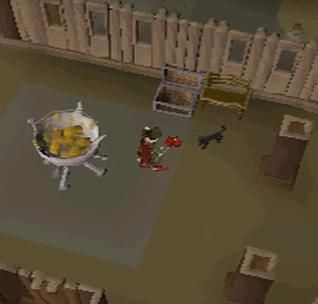
So, you need to head to Draynor Manor now and speak to Ava. She’ll make you the device needed to find the key piece but you need to give her a locator orb. For that, you’ll need 2 Molten Glasses and a Cut Dragonstone with a Glassblowing Pipe. Create an Inert Locator Orb and give it to her, and she’ll make the necessary adjustments and hand it back to you.
The orb damages the player in return for telling where the item is precisely located, so keep food with you. The key piece is located in a random location within Mort Myre Swamp, and when you’re at the exact location, a message in red will appear. That’s where you need to dig using your Spade to obtain the piece.
Key #3
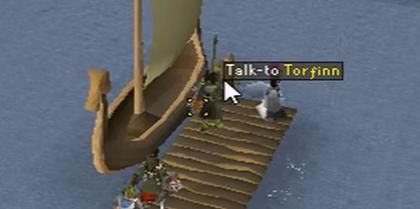
Bob then tells you that the next piece is hidden in an Abandoned Dragonkin Fortress, which is located northwest of Rellekka. Speak to Brundt the Chieftain to know that a dreadful monster has slain quite a few of his warriors who went there. He’ll permit you to fight the beast, and Torfinn is the person who will take you there. However, you need to defeat Vorkath (undead blue dragon) to pass through, and you need to bring weapons with venom immunity to defeat it.
You can look at the official Vorkath guide to know its mechanics. The best method to defeat the dragon is by praying Protect from Missiles if you’re using Ranged attack style with an anti-dragon item. Alternatively, when you’re equipped with Ranged, wear high damage output equipment, such as Toxic Blowpipe with Adamant or better darks, along with Karil’s Ranged armor. With that, you can pray Protect from Magic and use an Extended or Normal Super Antifire Potion. If you have access to a Slave Amulet (EI), you can increase the output damage against the boss.
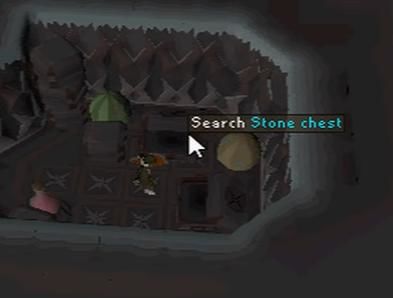
Once the beast is defeated, make your way to the abandoned fortress and search the stone chest to obtain the key piece.
Key #4
Bob will tell you that the next key is hidden by Camorra in a land far west. So, you need to make your way to Port Piscarilius and speak to the NPC named Veos (ask him about Camorra). The fastest way to reach him is by using Kharedst’s Memoirs or Book of the Dead. From there, you can run south towards the piers to locate him. Veos will recommend that you head to the Library Historical Archive to find your answers, and you can even teleport to a short run (southeast from the Grand Exchange) by using the Memoirs.
Make your way to the Arceuus Library and ask Archeio to teleport you to the Historical Archive. Over there, speak to Imerominia about Camorra, and she will direct you to Amelia of Shayzien and Jonathan of Hosidius.
The right historian to visit is Amelia, so head straight there, which is the house south of the Archery Shop in Shayzien. You can also use the Fairy Ring Network (D*J*R), Kharedst’s Memories, or Book of the Dead to reach quickly.
If you haven’t banked already, grab a Tinderbox and a Light Source, and then speak to her. She will ask you to go to the Shayzien Crypts, which is located southwest of the Graveyard of Heroes.
There are a total of three levels in the crypt, and you will need to make your way to the bottommost level. Keep your Protection Prayer on as there are NPCs that use all three combat attributes. Simply run past them to reach the crypt, and then from the upper level, take the northeast ladder down to reach the middle level. Now head to the furthest eastern ladder and climb down to reach the bottommost level. Go to the center and enter the southern door to inspect Camorra’s Tomb.
You will need to solve a riddle here. Grab the four busts of Tristan, Camorra, Aivas, and Robert from each of the corners and place them on the Plinths based on how the puzzle states it.
• Avias – Crossbow – Zartharim
• Camorra – Axe – Saranthium
• Robert – Bow – Arkney
• Tristan – Sword – Karville
Reforging the Dragon Key
You need to now head to the Ancient Caverns. But before that, it’s important that you have completed the initial Fire Making part of Barbarian Training, and have also obtained the instruction from Otto to create Pyre Ships to access the Ancient Cavern. Because otherwise, you won’t get an entry, and you’ll be washed up at the south shore.
Once you’re on the floor with Brutal Dragon, follow the eastern wall until you reach the staircase that leads to Mithril Dragons. Head upstairs and go east to find a door on the south-facing wall (mithril door).

Open the door with the ancient key and use Fire Wave or Surge, on all the 3-dragon head structures. Move back out and go along the eastern path, and then down the stairs.
Run to the southwest corner where the Barbarians are located, and then go up the staircase. Continue the path to the end and forge the four key pieces using one of the anvils to create the Dragon Key.
Now, go back to the dragon door, which is located on Lithkren, and place the key into it.
The Ultimate Weapon

Go through the Grandoise Doors and continue down the hallway to speak to either Dallas or Bob. A cutscene will trigger where you three locate a live dragon, right before a Dragonkin approaches. The Dragonkin named Zorgoth reveals its name as Galvek and a cutscene continues with a long conversation.
In the end, Zorgoth will call Galvek out of the incubation chamber, and it’ll shoot a fireball at you. You grab bob and avoid the attack, but Dallas ends up dead. Outside the area, Jardric investigates and finds Zorgoth and Galvek, which causes him to fire a shot at Galvek, right before being knocked away by Zorgoth. Galvek smashes through and flies off with Zorgoth, who is planning to launch an invasion on humanity.
United As One

Jardic and Bob will now suggest you get King Roald’s help, so you need to head to Varrock and fill him in about the invasion. Roald will trust you and ask you to gather the other kingdoms to work together. The representatives are King Lathas/King Thoros, Sir Amik Varze, and Brundt the Chieftain. The king’s advisor Aeonisg Raispher reaches out to the other people for help, so you don’t need to worry about that.
Once you’ve gathered them (spoke to them). Head back to the castle and speak to King Roald, who organizes a meeting in the dining hall. They are planning to launch an attack on Ungael, where all the dragons are gathered. Regardless of that, Bob will ask to speak to you outside.
He will tell you that the Dragonkin is immune to most of the weapons, and the dragon’s invasion won’t stop until Zorgoth is defeated. He also reveals that when Jardric attacks Galvek, even Zorgoth was injured, so that means they are both linked together. Once the conversation is over, make your way to Rellekka.
The Assault
The entire fleet will make their way to the Dragonkin Fortress on Ungael to stop Zorgoth, while Zorgoth sends his powerful dragons to counter.
Part 1.0
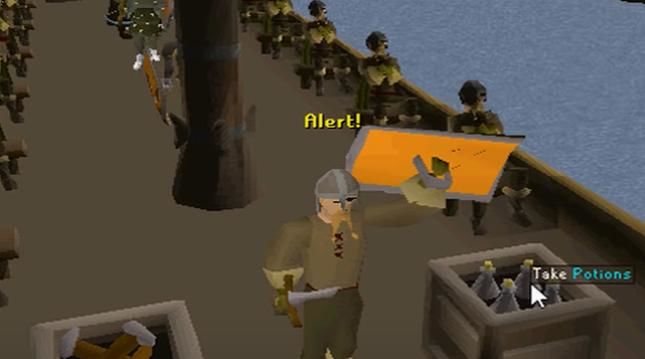
Speak to Torfinn in Rellekka, who is located on the northern dock of the market. You will be positioned on Brundt’s ship, and you need to repel the dragon’s attack for four minutes.
The dragon will basically launch Dragonfire towards the ship, which would either cause leaks, wound the rowers, damage the masts, or cause fires. There are crates on the ship that contain items to repair and maintain the damage. You need to ensure that the integrity doesn’t fall to 0%, or you’ll have to start over.
Revitalization Potions will heal the Fremennik Warriors, Hammer will repair the damaged masts, Water Containers will douse the fires, and Swamp Paste will fill the leaks. When you near the end of four minutes, the damage frequency to the ship will drastically increase. The best strategy is to repair the damage and heal the warriors closest to you.
Part 2.0
When the army advances onwards, make sure that you have Dragonfire protection at full because there are several dragons up ahead, who will launch fire attacks. Bring lots of food as may end up failing a few obstacles and deal damage.
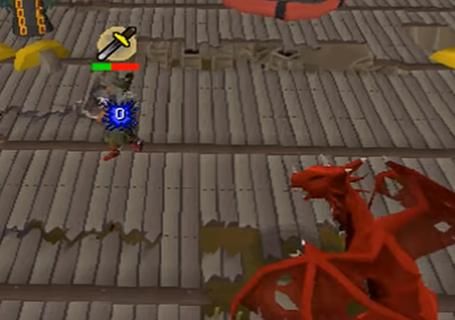
Leaders will be fighting an alone dragon, and you will have to kill it to proceed ahead. There are several fancy ships, the first one has a Red Dragon, followed by Iron Dragon on the second one, and Brutal Green Dragon on the final one.
Part 3.0

You need to help the Varrock Guard fight many dragons on the grand ship. It would consist of 2 Green Dragons and Blue Dragons. The dragons will have their focus on the guard, but they’ll shift their AGGRO once you close the distance.
Part 4.0
Once they are dead, Zorgoth and Galvek will board the ship. Galvek will launch Dragonfire, resulting in the Varrock Guard being dead. He will then launch an attack at you, causing you to leap away. Bob is killed in the process as he was right behind you.
You need to deal with two waves of dragons now, and during the waves, Galvek will launch fire attacks from the sky that can deal up to 115 damage (even if you have Dragonfire protection). You need to make sure that you move from your current spot, or turn the sound effect on to listen. When wave 2 starts, the leaders will appear and assist you in the battle but don’t expect much.
Wave 1
Black Dragon (level 227): Attack Style is Melee, Special Attack is Dragonfire, and it is weak to Range attacks.
Steel Dragon (level 246): Attack Style is Melee, Special Attack is Dragonfire, and it is weak to Magic attacks.
Brutal Red Dragon (level 289): Attack Style is Melee & Magic, Special Attack is Dragonfire, and it is weak to Range attacks.
Wave 2
Mithril Dragon (level 304): Attack Style is Melee/Magic/Ranged, Special Attack is Dragonfire, and it is weak to Magic attacks.
Adamant Dragon (level 338): Attack Style is Melee/Magic/Ranged, Special Attack is Dragonfire, and it is weak to Magic attacks. Bring an Antidote++ and stay at between an HP of 40 to 50.
Rune Dragon (level 380): Attack Style is Melee/Magic/Ranged, Special Attack is Dragonfire, and it is weak to Magic attacks. Switch to Insulated Boots and keep your HP high.
Part 5.0
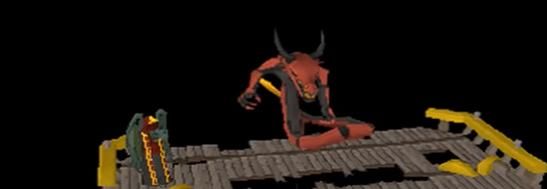
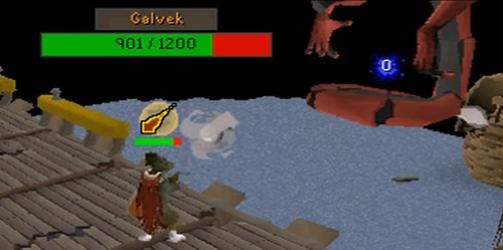
It’s time for Galvek to finally confront you. He has 1,200 HP and four different phases. Two Brutal Green Dragons also drop at the same time, but the leader will hold them off while you keep your focus on Galvek.
Phase 1
Galvek will launch fire traps at the range, and if you get touched, you will deal maximum health damage. They explode after a specific set of time or if Galvek shifts to his second phase. You can avoid the traps by moving north to south in front of him, but make sure to pray for Magic and don’t take any physical damage from him.
Phase 2
Galvek will harness the power of air from the west side and begin his Ranged attacks. He will be able to launch hurricanes that can drain your stats and run energy. Pray Ranged during this phase.
Phase 3
Galvek will harness water power from the east side and begin launching tsunami attacks at you. It will have one gap as the escape route, and if you’re hit, it can deal 109+ damage. Also don’t keep your auto retaliate on during this phase, as there’s a chance that you may walk into the attack.
Phase 4
Galvek will harness the earth’s power, and he’ll land right in the middle of the ship. He’ll be able to launch earth projectiles that can entomb you in stone if you’re hit. If you move as soon as the attack is launched then you can avoid it, but if you’re hit, you’ll have to wait until you’re freed from it. If you feel that you might end up dead, you can teleport out.
The Ending
Once Galvek is dead, he’ll throw his last fireball to destroy you, but as he comes falling to the ground, the fireball changes its direction backward and kills Zorgoth. With both dead, the battle will come to an end.
You will be brought back to Burthorpe, where you, along with Unferth and Neite will mourn Bob’s death. Once that’s over, head back to Alec Kincade of the Myths’ Guild to complete the quest.
Regarding this article about the detailed strategy of OSRS Dragon Slayer II Quest, I believe you can easily complete this quest. If you need OSRS Gold service in the game, please choose RSorder, more discounts and premium services are prepared for you.