
OSRS Monkey Madness I Quest Guide
May-31-2021 PSTMonkey Madness I is the sequel to The Grand Tree quest, as well as a part of the Gnome OSRS Quest Series. In this quest, you will have to help the King of the northern Gnomes named Narnode Shareen once again. Due to overseeing the decommissioning of the Gnome shipbuilding facilities, the king has dispatched his 10th squad consisting of royal guards, but it has been a while since he has heard back from them, and it seems that they’ve been missing. It is up to you to track them down. However, there is a sinister force bestowed upon the Genome hierarchy, and it threatens to perish anyone that comes in its way. You must be careful and only take upon this quest if you meet the requirements that are listed below.
Quest Requirements
● The Grand Tree
● Tree Gnome Village
OSRS Items Required
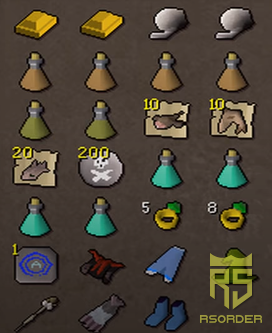
● A Ball of Wool
● Money Bones / Corpse from Karamja (Can be obtained during the quest)
● A Gold Bar
Recommended Items / Skills
● 43+ Prayer (To be able to cast ‘Protect from Melee’).
● Energy / Stamina Potions
● A knife
● A Lockpick
● Emergency Teleports (Ex. Ring of Life).
● A Ring of Duelling (For quick banking).
● Anti-poison / Antidote++ Potions
● Prayer Potions
● Ardougne cloak 1 / Teleports to Ardougne
● 200,000 RS Gold Coins
● Weight-Reducing Gear
● Good High Healing Food
Enough combat level to defeat a level 195 Jungle Demon.
1st Chapter

To start this quest, you must first speak to King Narnode Shareen, who can be found in the Tree Gnome Stronghold. He will hand you the Gnome Royal Seal and ask you to investigate Glough’s old shipyard for any trace related to the disappearance of the 10th squad. So, head to Karamja using the Glider located at the top of The Grand Tree, and enter the shipyard, just north of the landing site. You’ll find G.L.O Caranock in the southern area, speak to him and he’ll suspiciously advise you to go back to the king. The king will hand an item called ‘Narnode’s orders’, and he’ll ask you to speak to Daero, who can be found on the 2nd floor of The Grand Tree, next to the Blueberry Bar. Surfing through the chat options, tell him that you’re prepared to leave and he’ll take you to an underground area. Upon reaching, talk to Daero again and he’ll introduce you to Waydar. You will now be tasked with solving a puzzle, and you can do this using the panel southeast of the southern glider.
Use the following method to solve the puzzle:

1. First operate the 1st, 2nd and 3rd pieces in the upper left corner.
2. Now, position the 4th piece in the upper right corner.
3. Move the 5th piece under the 4th piece.
4. Slide the 4th piece left and the 5th piece up to complete the first row.
5. Repeat the same for the second row, without touching the row above.
6. The pieces of the last two rows need to be solved together.
 If you’ve done Treasure Trails before, then you’ll notice that this puzzle is similar to it, making the puzzle easier for experienced players. In any case, if you don’t want to waste time, then you can pay Glough (Resides in the same area as he was during The Grand Tree quest) and complete it. Once completed, first talk to Daero, then to Waydar and they’ll both escort you to Crash Island where the King’s 10th squad had landed. From there, when you ask Lumdo to take to you Ape Toll, he’ll refuse. So, speak to Waydar again and then speak to Lumdo so that he agrees to take you there.
2nd Chapter
Part 1

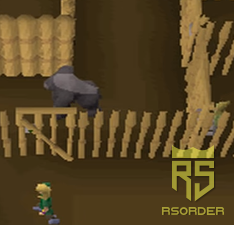
Once you reach, head west while sticking to the southern coastline, until you see a Mahogany tree, and then from there change your direction towards the north. Be wary of Snakes, Scorpions and Jungle Spiders, as they can poison you. While travelling north, turn your ‘Protect from Missiles’ on as you’ll constantly be hit with poisonous arrows until you reach the gate. In the end, you’ll end up being knocked up and you’ll wake up in a prison.
 This prison cell is guarded by Trefaji and Aberab. In the prison, you’ll find a member of the 10th squad named Lumo, speak to him. The guards patrol throughout the prison and you will have to lockpick the cell door to escape. So, you have to be careful because if you’re caught, they’ll punch you (Deals 15-20 damage). Once you’re out, go north, then east to find the NPC named Karam, who is also a member of the 10th squad. He’ll be in the bushes near the crafting shop. Travel south from there, hiding in the jungle grass to be protected against the archers, until you get past the door. Now, go around the castle counter-clockwise east, until you’re in between the castle and the building south of it. Just each of the building, you’ll find Garkor, who is the sergeant of the 10th squad.

Speak to him and he’ll ask you to meet Zooknock. Go west through the grass from there, and continue till you see the doorway north. It can be identified by a blue square on the mini-map, consisting of other squares like red, blue, yellow and green. Walkthrough the blue marked door to reach an area with monkey guards sleeping, monkey dentures crates and banana crates.

When you enter, stay on the dark brown ground or you’ll end up in jail again if you’re caught. In the south-western crates near the ladder, you’ll find bananas. So, stay on the drank brown side, step east, then north and search the crates in the middle of the room to obtain monkey dentures. The sleeping guard there isn’t a threat as long as you don’t speak to him. Now, search the crate in the south-eastern area to enter a cavern, and head north-west to search for crates to acquire the M’amulet Mould.
Part 2

You can bank and re-supply if you wish to, and then return to Ape Toll. From there, head south of the island, west of Lumdo and make your way into the dungeon. It is recommended that you turn your ‘Protect from Melee’ on whenever you’re at threat by another NPC. During your travel, you may also be hit by rocks, which can be indicated as your screen shakes and a rumbling noise occurs. You can avoid the rocks by standing under the grey area shown on your mini-map. The claws traps in the dungeon can also be avoided if you stop one square before the trap, and run your way through when it’s safe. At the end of the dungeon, you’ll find three NPCs; Zooknock, Waymottin and Bunkwicket. Speak to Zooknock and use the Money Dentures, M’amulet Mould and Gold Bar in your inventory, on him. Before leaving the dungeon, you’ll be given an enchanted bar.
Part 3

Escape the dungeon, and get caught to reach back into the jail cell. From there, head east down the trapdoor in the temple and activate your ‘Protect from Melee’ prayer beforehand to avoid the attacks from the Monkey Guards. To avoid the guards at the trap door, the best route is to climb upstairs, then down the ladder to the east and if you don’t use this route, wait for the guards to move away by hiding in the north-eastern corner of the temple.

In the trapdoor, you’ll find Monkey Zombies. Ignore them and use the enchanted bar on the Wall of Flames. Now, head back up, use a Ball of Wool with the amulet to create a M’speak Amulet and go to the building located west of the jail. Here you’ll find a banana garden with a Monkey Child in it, who is being patrolled by The Monkey’s Aunt. Wait for the aunt to walk away, then speak to the child, because if you don’t wait and if she catches you, then she’ll call the monkey guards to throw you back in the jail cell.

The child will tell you to have he needs to pick up 20 bananas, so pick 5 or so from a nearby tree which should be sufficient and talk to him again. Ask the Monkey Child for his Monkey Talisman, and use the drop – speak method to get more than one talisman.
Part 4

You need to now head back to Zooknock, which is located in the tunnel. Use the Monkey Bones and Monkey Talisman on him, and he’ll give you a greegree depending on the bones that you gave him.
3rd Chapter

Now, wield the greegree to turn into a monkey. In this form, you don’t have to worry about being caught or attacked by the Monkey Guards. You will now have to speak to Garkor again in this form, and then while equipping your M’speak Amulet, you’ll have to speak to the Elder Guard near him. The Elder Guard will ask you to talk to Kruk. So, head west till you reach the western shore of the island, go south from there and then climb up the bamboo ladder on top of the hill. Cross the bridge, use the ladder on the east side to go down and you’ll find Kruk. He will take you back to King Awowogei, who you’ll have to speak to and make an alliance with. He will first ask you to free a monkey from the Ardougne Zoo, so head there wielding your greegree and speak to the Monkey Minder to be placed into a cage. Talk to a monkey inside and it’ll hope into your inventory, then unequip the greegree and speak to the Monkey Minder to be set free. Return to Ape toll, speak to Awowogei again and the alliance will be considered.
4th Chapter
Transform back to a human and speak to Garkor to obtain a 10th Squad Sigil. Now, head to the bank and prepare for the fight. Once you’re ready, equip the Sigil and you’ll be teleported to the area where the Jungle Demon lies. The best way to defeat the demon is by making use of a Dwarf Multi-Cannon, along with Ranged or Mage, or by luring him towards the 10th squad gnomes. Always keep your ‘Protect from Magic’ on, and bring Prayer Potions, as well as the best possible food you can afford.
Conclusion
Once the demon is defeated, talk to Garkor and he’ll direct you to Zooknock to be teleported back to Ape Toll. Now, escape the island, head back to the Gnome Stronghold and speak with King Narnode and complete the quest!