
OSRS Mourning End Part II Quest Guide
May-24-2021 PSTThis is a part of the Elf Quest Series and is famous because of the challenges that it beholds upon the players trying to complete it. In this quest, you have to go deep under the mountains of Arandar to put an end to the evil bestowed there. Upon succeeding, you are tasked to solve one of the most difficult puzzles known to mankind.
Quest Requirements
● Roving Elves
● Regicide
● Underground Pass
● Plague City
● Biohazard
● Big Chompy Bird Hunting
● Sheep Herder
● Waterfall Quest
Items Required
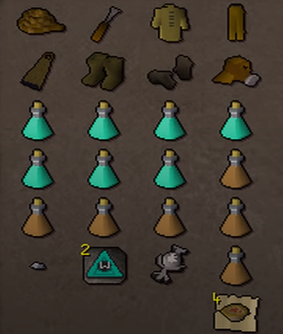
● Full Set of Mourner Clothes
● A Death Talisman / Death Tiara
● Chisel
● Rope
Recommended Items / Skills
● 43+ Prayer (To use Protect from Melee)
● 70+ Agility (To avoid the chances of failing the obstacles)
● Teleportation means to Ardougne (Minigames Teleport / West Ardougne Teleport)
● Elf Teleport Crystal
● A good amount of Food, Prayer Potions and Stamina Potions.
● Armour with high Prayer bonus.
● Melee weapon that provides Prayer bonus.
● A Pure Essence to craft a Death Rune at the Death Altar (Requirement to complete a Hard Ardougne Diary task).
Enough combat level to be protected against level 73 Shadows.
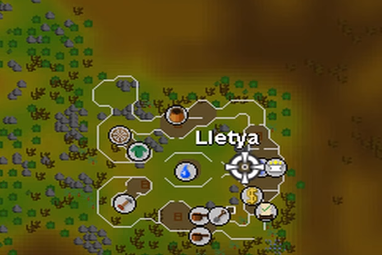
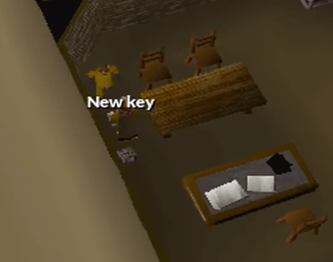
To start this quest, you must first speak to Arianwyn, who is located in Lletya. He will ask for your help to stop the mourners from what they’re about to do under West Ardougne. He will also mention that you’ll need a key to enter the area. So, put on your mourner's clothing and go to the basement in Ardougne to reach the Mourner’s Headquarters. Once you reach, speak to Essyllt and he will provide you with a key to gain access to the nearby tunnels, leading straight into the Temple of Light. He will task you to find the digging team, so leave the room and open the door to your west. Enter the tunnels, run past the level 182 Dark Beasts with Protect from Melee Prayer turned on. Reach the entrance of the temple and a cutscene will begin. Once it ends, you’ll be attacked by level 73 Shadows, avoid them and search the corpse near the northern wall to obtain Edern’s Journal.
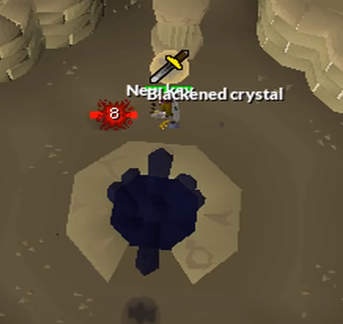
Now, from there go west, enter the Temple of Light and take the stairs west of the entrance to reach the middle floor. On the south wall, you’ll see a ladder that leads to the top floor. Take it, then use the middle stairs to cross and head east till you see the blackened crystal. Use your chisel on it to break a piece of it and go back to Arianwyn. He will call upon Eluned to enchant the crystal into a newly made crystal. This item will be used at the end of the quest, so hold onto it. Speak to Arianwyn again and prepare yourself to solve various puzzles.
For the first puzzle, you’ll need at least 4 inventory spaces, which will increase to 13 as you reach the last puzzle. You can bank after completing a puzzle to save your progress, and if you by chance try to bank during an ongoing puzzle, it may change entirely the time you return and try again. So, that is not recommended at all.
1st Chest
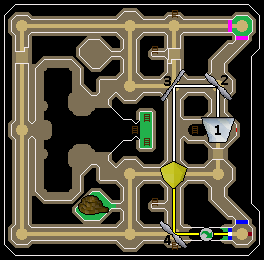
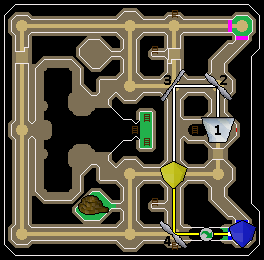
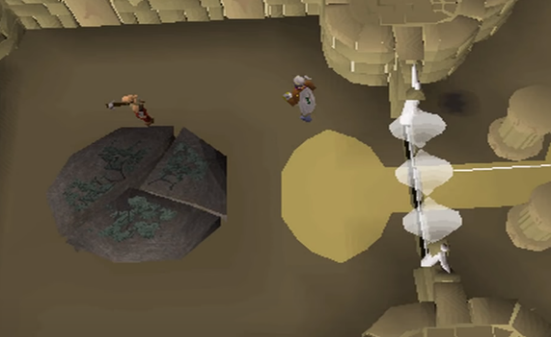
Head back to the Temple of Light and take the west staircase by the entrance to reach the middle floor. On your mini-map you’ll see an icon with a rope, go here and use the rope on the rocks to free inventory space. Now, drop your new key (It can be obtained again) to free another, and go to the Mirror that is marked with #1, located east of the staircase. Pull the crystal dispenser to reset the puzzle, and click on it again to obtain a Yellow Crystal, along with 4 Mirrors. Place Mirror #1 facing north, #2 facing west and #3 facing south. Now, place the Yellow Crystal at the next junction to turn the colour of the light yellow and place the final Mirror (#4) facing east, just over the gap. Cross the gap to reach the other side by taking support of the south sidewalls. Pass through the Blue barrier, open the chest to receive 2 Mirrors and a Cyan Crystal.
2nd Chest
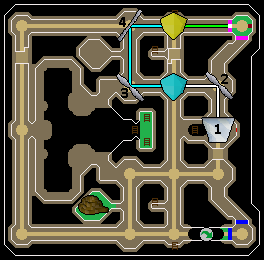
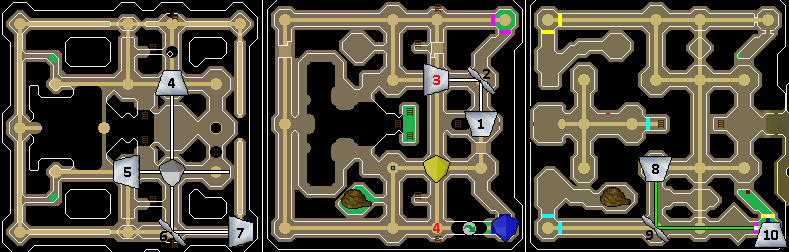
Return to the Crystal Dispenser to reset the puzzle. You’ll now have 6 Mirrors and two Crystals in your inventory. So, place Mirror #1 facing north, #2 facing west, and then place the Cyan Crystal at the next junction to turn its light Cyan. Now, place Mirror #3 facing north, Mirror #4 facing east, and place the Yellow Crystal at the junction to turn the light Green. Pass through the Magenta barrier, open the chest to obtain 2 Mirrors.
3rd Chest
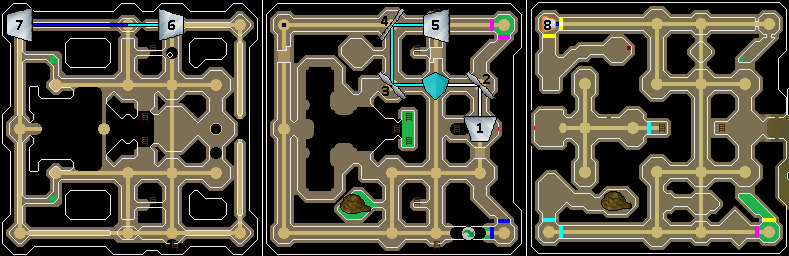
Go back to the junction and pick up the Yellow Crystal to turn the light Cyan, and place Mirror #5 facing up to make the light shine towards the upper floor. Climb the ladder north, place Mirror #6 facing west and climb back down to the middle floor. Go to the south ladder, climb up, go to the northwest corner and place Mirror #7 facing down, making its longest side face east. Climb back down to the middle floor, then using the east staircase, go down to the bottom floor. Go to the northwest corner, where you’ll notice that Mirror #8 is already placed, turn it around to pass the Yellow barrier and open the chest to receive 2 more Mirrors, as well as a Fractured Crystal.
4th Chest
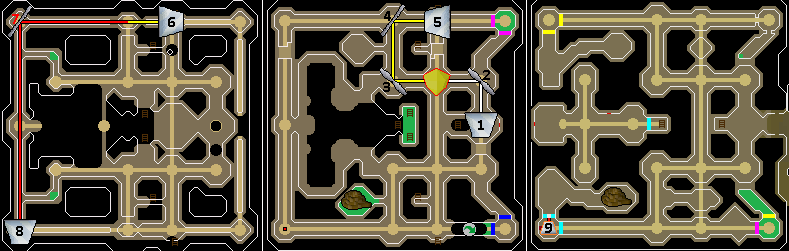
For this chest, you’ll need to use the rope shortcut, so make sure that the rope is placed as it was done during the 1st Chest. Now, switch Mirror #8 to exit east and climb the staircase to get to the middle floor. Pick up the Cyan Crystal, turning the Cyan light to White, and at the same junction place the Yellow Crystal to turn it Yellow. Climb the south ladder that leads to the top floor, go to the northwest corner and rotate Mirror #7 facing south to turn the Yellow light to Red. From there, go south, place Mirror #8 (Not the same Mirror #8 from the 3rd Chest) facing down and climb the south ladder down. Use the rope shortcut there to reach the bottom floor and pass through the Cyan barrier as Mirror #9 is already placed. Open the chest to receive a Blue Crystal.
5th Chest
Part 1
Now, head to the Crystal Despenser and reset the puzzle entirely. You will have 10 Mirrors and 4 crystals in your inventory. Place Mirror #1 facing north, #2 facing west, #3 facing south and place the Yellow Crystal south to turn the light Yellow. Place Mirror #4 east, cross to the other side, pass through the blue barrier and place the Blue Crystal there.
Part 2
Cross back, climb to the middle floor and remove Mirror #4, while rotating Mirror #4 facing up. Climb to the top floor using the south ladder, place Mirror #4 in its new position facing south, and place the Fractured Skull there to split the light into 3. Place Mirror #5 near the western light facing down, #6 near the southern light facing east, and #7 facing down, with its longest side facing west. Now, climb down the south ladder, then the east staircase again to reach the ground floor. You’ll notice a Greenlight passing through the ceiling, so place Mirror #8 facing south, #9 facing east and cross the Magenta barrier. Over here, you’ll notice a Blue light passing through the ceiling, so place Mirror #10 facing north and finally pass through the Yellow barrier to open the chest. You’ll obtain 3 Mirrors and another Fractures Crystal from it.
Final Puzzle
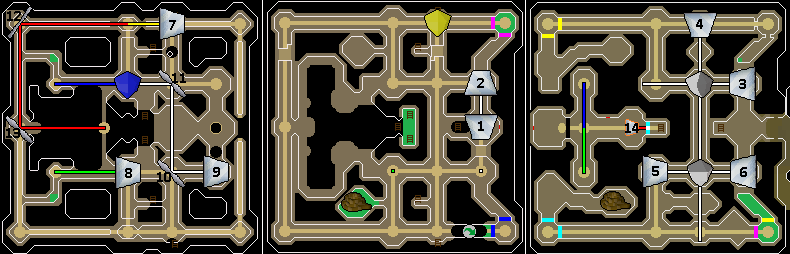
 Return to the dispenser, reset the puzzle and you should have 13 Mirrors and 5 crystals in your inventory. Place the first Mirror facing north, second facing down and use the east staircase to go to the bottom floor. Place Mirror #3 facing west, place the Fractured Crystal there to split the light and then place Mirror #4 near the northern light facing up. Near the southern light, place the second Fractured Crystal to split the light again and place Mirror #5, Mirror #6 near the western and eastern light respectively facing east. Climb to the middle floor using the east staircase and you’ll notice a white light, so place the Yellow Crystal there to turn the light Yellow. Climb to the top floor using the northern ladder, place Mirror #7 facing west, and you’ll see the light turn red at the western pillar. Climb down using the north ladder, then up from the south ladder to place Mirror #8 near the green light facing west, Mirror #9 near the white light facing west and Mirror #10 near the white light facing north. Cross to the north section of the top floor through the middle stairs and place Mirror #11 near the white light facing west. Place the Blue Crystal there to turn the light Blue, and then make your way to the northwest corner of the room to place Mirror #12 facing south. Also, place Mirror #13 to shine east and go to the ground floor using the middle stairs. Mirror #14 is already placed, so pass through the Cyan barrier and rotate the Mirror near the red-light facing west. In the end, the black barrier in front of the Death Altar will turn white and open.
 Use the Death Talisman in your inventory on the altar, and then use the newly made crystal on it to charge the item. Exit the area, and then out of the final chamber to reach the black crystal. Use the charged crystal on it to stop anyone from entering the temple again. Finally, speak to Lletya to complete the Mourning's Ends Part II - OSRS Quest. Congratulations!